I know you're a thoughtful and genial bunch of readers, and I understand you're experiencing acute compassion pangs right now at the thought of me not being surprised by your gifts. Pull yourselves together! Will it help you to know that my pretend-surprise will be almost certainly be convincing? I've got thirty-plus years of attentive gift-rattling, -sniffing, and general-sizing-up behind me and it's been ample time to practice my "hey, wow, this is great!" face, so you needn't worry. On to the goodies.
At the top of my list at the moment is Brendan Connell's Lives of Notorious Cooks, a very recent release from Chômu Press. It contains biographies for fifty one fictional cooks, and early reviews, though brief, are promising. I only had to read as far as "eel hash in the shape of slippers" before I was sold on it, but I have graciously held off on buying it for myself so that you may have the opportunity to delight me with it.
At the top of my list at the moment is Brendan Connell's Lives of Notorious Cooks, a very recent release from Chômu Press. It contains biographies for fifty one fictional cooks, and early reviews, though brief, are promising. I only had to read as far as "eel hash in the shape of slippers" before I was sold on it, but I have graciously held off on buying it for myself so that you may have the opportunity to delight me with it.

Lives of Notorious Cooks by Brendan Connell,
$12.50, available here.
This minke whale knife by Saikai Toki Trading Inc. also recently caught my eye. It's cast iron and made in Japan so it'll last forever, and how nice would it be to have a whale hanging out on your knife rack?

Minke whale knife,
$60 at Creatures of Comfort here.
My oven mitts are grubby and need replacing. I like these "Glove & Hate" ones by Stuart Gardiner.

Stuart Gardiner "Glove & Hate" oven mitts,
£24 at Howkapow here.
Is your person you're shopping for more of a snacker than a cook? Maybe a solid brass pretzel or a solid sterling silver pistachio is just the thing. Both are available as necklaces from Etsy seller Gold Teeth Brooklyn, who also has a piece of popcorn you may be interested in. All are cast from real snacks.


Is your friend a lover of mushrooms? Eugenia Bone's Mycophilia: Revelations from the Weird World of Mushrooms came out last year but I'm just making my way through it now. It's written in a warm, easy-going, narrative style but it's full of information about mushrooms and mushroom people. Jane Grigson's classic 1975 cookbook The Mushroom Feast would be an ideal companion for it. It's got more than 250 mushroom recipes, written in Grigson's erudite, opinionated, and stylish but relentlessly practical prose. (She's one of my all-time favorite food writers). A Swedish mushroom tea towel too? It's made of a linen-cotton blend so it'll age well, though I'd be more tempted to hang it on the wall rather than use it. What I'd most like to receive this Christmas is some dried candy cap mushrooms, which are often used in desserts because they reportedly taste like maple syrup. I've wanted them for ages now but I'm trying to put my foot down on my habit of buying every kooky ingredient I've fallen in love with. A Shrooms canister to keep them in — or my more prosaic boletes — would not be unwelcome.


Eugenia Bone's Mycophilia: Revelations from the Weird World of Mushrooms, $17.15 from Amazon here; Almedahls wild mushrooms tea towel, $18, from Huset Shop here; Wineforest Wild Foods dried candy cap mushrooms, $17, available here; Jonathan Adler Shrooms canister, $98, from his shop here; Jane Grigson's The Mushroom Feast, $29.95 from Amazon here.
Any stylish mushroom-lover would surely be thrilled to receive a copy of Emily Taylor's zine Fruiting Bodies, which she describes as "[a] celebration of beautiful fungi forms, 26 different types of mushrooms and their proper latin names, combined with fashion-inclined illustrations and pattern work."


Fruiting Bodies zine by Emily Taylor, $12 Can. on Etsy here.
This Finnish mushroom knife with a little brush at its end for sweeping dirt away would be a very nice gift for someone, too. I've been meaning to join the NYC Mycological Society on one of their walks for ages now — did you know it was founded by John Cage? — and this handsome little knife looks like it would be a good companion. It's made of beechwood.

Finnish mushroom knife,
$75, at Mjölk here.
After a dozen or so years of more-or-less-OK-but-not-stellar service, I wouldn't be sorry to see my peppermill replaced. I think I've narrowed the field down to two potential replacements: this maple one by Muuto, which comes with a 25-year guarantee on the grinding mechanism, and this glossy black one from Unicorn, which has been making peppermills on the island of Nantucket for many years now, and which gets very favorable reviews. Both are available in other colors and styles and there are matching salt mills, too, so click through if you're interested in browsing.


Muuto maple wood peppermill, $89, available from the Finnish Design Shop here; Unicorn key-top peppermill, $27, available here.
I'm a big fan of Etsy shop knife in the water and already have some of her napkins, among other things. I think I also need these new ones, clementine, a bowl. They're made to order and the cotton is dyed with natural ingredients.

"clementine, a bowl" napkins, $20
from knife in the water on Etsy here.
Kiosk is always a good source of gifts. I'm fresh out of cocoa powder and they've got an appealing Dutch one, Blooker, that I'd like to find in my stocking, or sitting inside a big wonky mug. I used to buy Penzeys cocoa powder from their little shop in Grand Central, but since it closed I've been adrift. This one looks like the cocoa equivalent of Belbury Poly, which is a plus as far as I'm concerned.

Blooker cocoa powder,
$12, at Kiosk here.
The Meadow is another terrific little shop. I can't go there to buy someone a present without getting something(s) for myself. Salt, always a jar or two of salt, but they have an amazing selection of chocolate and bitters too. Right now a jar of hand-harvested lemon flake Mediterranean sea salt, some Djiboutie Cuties, and a Dolfin green aniseed chocolate bar would be very welcome in my household. If you're in the market for a special salt that isn't quite so challenging in appearance, I've been really enjoying their Shinkai deep sea salt over the past couple months; it's got a well-balanced flavor and an irresistibly snowy texture. The Meadow also carries my favorite smoked salt, which is from Cyprus and is hardwood smoked. I've made my own smoked salt several times (always Maldon, over various types of wood chips or tree bits), but this one has a sweetness and a wild-nighttime-bonfire quality that I'll never be able to duplicate at home without Cypriot assistance.

Lemon flake salt,
$5.50 for the smallest jar, at The Meadow here.

Djiboutie Cutie salt (!),
$11 for the smallest jar, at The Meadow here.
If you want to go all out this year with respect to kooky salts, consider this wild blueberry Alaskan sea salt from Salt Traders. It's hand made by a couple who started drying out their own sea salt on top of their wood stove. I think it could be amazing on seared scallops, among other things. Salt Traders also has some interesting spiced sugars right now. The first thing I'd make with this "winter warmer" set would probably be shortbread cookies with curry sugar. The "spiced gold" one is Hawaiian sugar flavored with cinnamon, nutmeg, ginger, and allspice.


Alaska Pure wild blueberry sea salt, $12.50, and mini winter warmer sugar set, $8, both from Salt Traders here and here.
Speaking of salt, I have been searching for the perfect vessel for my basic, everyday mother lode for years now, and I think I've finally found it: 16 oz. capacity, and a nice big lid on the top rather than a troublesome little hand-hole.

How gorgeous is this Iittala platter? It's from their Korento collection by Klaus Haapaniemi, full of poppies and dragonflys, and it also comes in blue. Either color would look great peeking out from under some roasted cauliflower or whatnot in a blog post. I'm just saying.

Iittala Korento platter, $94
from Finnish Design Shop here.
Do you know any food people with pets? Think carefully about this, because there are some adorable food-themed presents for kitties on Etsy.

My cat Vivian's Christmas face.


Olive, plum pudding, and watermelon catnip toys, $6 -7 each, from Small Wonders Art on Etsy.
Catnip sardines, $12, from Miso Handmade on Etsy.
Catnip sardines, $12, from Miso Handmade on Etsy.
Dogs love to get presents too, of course. The artichoke below has a hiding spot for a treat, which will allow you to prepare your soon-to-be-famous artichoke with peanut butter before you leave for work in the morning.


Orbee Tuff Artichoke dog toy, $12.99, boiled wool carrot, $7, and veggie pizza, $17.99, all from Olive Green Dog.
No matter how many apps I experiment with, my favorite way to keep track of cooking and blogging ideas is to write them down on bits of paper. This partially explains why I still haven't gotten around to making, e.g., the salted nimbu pani sorbet I was so excited about scribbling down months ago, but realistically it's just not a habit I'm going to drop anytime soon. So, for me at least, notebooks are always a good idea. I like these mouthy ones from Etsy, but a small stack of Rhodia always has a stirring effect, and any decent stationery store has those, in both lined and graph paper.

Mouthy notebooks,
$13.50, from NotbookNotbuk on Etsy here.

Exciting neon enamel Caran D'Arche pens,
$20 each, from Ann Mashburn here.
I do cook from my iPad all the time though, and I could really use a nice stand for it. The one I have now is more suitable for doing desk stuff than kitchen stuff. The one below is made from reclaimed oak and can be mounted on the kitchen wall, out of flouring range. I've also been admiring these chunky ones from Block and Sons Co. because I'm a sucker for a live edge on a piece of wood.

iPad easel,
$50, from Peg and Awl on Etsy here.
How is it that I don't have a donabe? A donabe is a Japanese clay cooker that you can use for steaming, roasting, stewing, smoking, and stir-frying. And chilling. Oh right, a crammed little kitchen and no place to put one. The thing is, they're so versatile that in my mind I would be able to get rid of several other cooking vessels if I had one. Hmm.

Fukkura-san donabe,
$130, from Tortoise General Store here.
Something else I've wanted for a long time and don't really have a spot (or a need) for is one of these Thai tamarind wood cutting boards. The surface of my kitchen table is butcher block, the surface of my nearby desk is butcher block, and I've got several very nice cutting boards besides. I can chop and chop and chop before having to stop for washing, but still, it's only natural that my eyes should wander. They keep wandering back to this thing. A solid slab of end-grain tamarind wood! It's got a handle, and it's cheap too. There's no good reason why I haven't bought the damn thing for myself. I guess I've been holding out until I have a kitchen that can accommodate a whole stump, Thai street vendor-style.

Tamarind wood cutting board,
$35, from Import Food dot com here.
I've also been eyeing this Quadretti chopping board by artist and designer Francesca Iannaccone. It's made in Sweden from hardwood with a heat-resistant surface, and it's a good size for picnicking or for cutting up citrus for drinks.

I'm probably alone in wanting one of these Italian beechwood drying racks for Christmas. It's lo-fi and I'm into that. Drying your own foodstuffs is an easy way to preserve them, and how great would it be to open a jar of home-dried currants from the summer farmers' market and shake some into your winter oatmeal? Or to obsessively, compulsively tend to a batch of fascinating mushrooms or unusual, chance-encountered peppers, turning them over and repositioning them just so while making long-range plans for them? OK, just me then.

Quadretti chopping board, £20
from Mrs Eliot Books on Etsy here.
I'm probably alone in wanting one of these Italian beechwood drying racks for Christmas. It's lo-fi and I'm into that. Drying your own foodstuffs is an easy way to preserve them, and how great would it be to open a jar of home-dried currants from the summer farmers' market and shake some into your winter oatmeal? Or to obsessively, compulsively tend to a batch of fascinating mushrooms or unusual, chance-encountered peppers, turning them over and repositioning them just so while making long-range plans for them? OK, just me then.

Lo-fi beechwood food dryer,
$38.99, on Amazon here.
Are there any lo-fi freaks who are into foraging on your shopping list? You should get them a tick-plucker-offer. I like poking around in the woods and I've known people who've had terrible experiences with undiagnosed Lyme disease, so I already have one of these. They're lightweight aluminum, fit on a key ring, and can be used to extract nasty little ticks from people and pets.

That same person would probably love a copy of Vivien Weise's Cooking Weeds, which I'm planning to write about soon. It's a slim little book filled with vegetarian recipes for things like spruce ice cream, comfrey-hazelnut butter, daisy soup, and nipplewort minestrone. It's somehow very Tiny Banquet Committee, actually — a friend flipping through it in my apartment said "this book is, like, 30 blog posts."

Guaranteed to please any kitchen-centric hippie, a set of durable cotton, hemp, and beeswax storage thingies to replace plastic wrap. They're good for cheese fiends too, because they allow cheeses to breathe a bit without drying out.

For the outdoorsy hiker-cook, how about a camping stove by Biolite that can also charge their gadgets? I haven't tried one yet myself but I've seen several reviews of it, all positive. You don't have to bring any fuel into the woods with you because it's powered by kindling. Don't delay if you're thinking of buying one — the last date to order before Christmas is December 14th.

For the drinks-maker on your list, a good muddler and a pewter jigger would probably go over well. This jigger is handmade in Italy and measures half an ounce on one side and one and a half ounces on the other, and it will retain its good looks forever. The muddler has a better design than most: as the seller explains, "[its] ends closely match the inside radius of drinking tumblers, which can be used as mortars when crushing peppercorns, parsley, rosemary, sage, etc. in home cooking. As the end sections are slightly smaller diameter than the central shaft, it's an excellent small rolling pin as well."


For anyone and everyone: I've got three of these little knives and they're among my most-often-reached-for. They're perfect for picnicking or car trips, too, because they come with covers for their blades. If you're in NYC, Bowery Kitchen Supply in Chelsea Market has them in every color of the rainbow, temptingly close to the cash register. I always have to remind myself that I don't really need one more.

Buying things made in Maine makes me happy. I've got a well-established, long-standing thing for Maine. This organic linen tea towel is hand-printed with mussels by Mainers.

Would it be unreasonable to suggest that you have a gorgeous blue teapot shipped from Australia? I suppose the answer depends on where you are. It's hand-built and beautifully glazed and I can't stop looking at it.


Beer people get a calendar of their own by designer and illustrator Heidi Schweigert, with a beer and an ideal food pairing for each month.

If you happen to know that your cook likes a clean, graphic, possibly Scandinavian-influenced style and has a bare spot on his or her kitchen wall, how about a print of winter fruits?


Indigo pomegranate giclée print by anek,
$80 on Etsy here.
 Breakfast Time print by Becca Stadtlander, $25
on Etsy here.
Cooking a lot is rough on the hands. My favorite cream for years now is L'annine because it's really effective and not greasy. I always get the one with mango oil because it smells amazing. The version with avocado oil does have an avocado scent but it isn't very strong, so that one's probably a better choice for guys.


The Tick Key, $6. See website for retailers.
If you're in NYC, REI has them.
That same person would probably love a copy of Vivien Weise's Cooking Weeds, which I'm planning to write about soon. It's a slim little book filled with vegetarian recipes for things like spruce ice cream, comfrey-hazelnut butter, daisy soup, and nipplewort minestrone. It's somehow very Tiny Banquet Committee, actually — a friend flipping through it in my apartment said "this book is, like, 30 blog posts."

Cooking Weeds by Vivien Weise, $17.95
from Amazon here.
Guaranteed to please any kitchen-centric hippie, a set of durable cotton, hemp, and beeswax storage thingies to replace plastic wrap. They're good for cheese fiends too, because they allow cheeses to breathe a bit without drying out.

Abeego storage wraps, $11 to $15 from Branch Home here, via Remodelista.
For the outdoorsy hiker-cook, how about a camping stove by Biolite that can also charge their gadgets? I haven't tried one yet myself but I've seen several reviews of it, all positive. You don't have to bring any fuel into the woods with you because it's powered by kindling. Don't delay if you're thinking of buying one — the last date to order before Christmas is December 14th.

BioLite camp stove, $129 here.

Pewter double-sided jigger, $95
from Kaufmann Mercantile here.

Hard maple muddler / pestle / rolling pin, $6.99
from Lee Valley & Veritas here.
For anyone and everyone: I've got three of these little knives and they're among my most-often-reached-for. They're perfect for picnicking or car trips, too, because they come with covers for their blades. If you're in NYC, Bowery Kitchen Supply in Chelsea Market has them in every color of the rainbow, temptingly close to the cash register. I always have to remind myself that I don't really need one more.

Kuhn Rikon paring knives, $9.95 each from Sur la Table here.
Buying things made in Maine makes me happy. I've got a well-established, long-standing thing for Maine. This organic linen tea towel is hand-printed with mussels by Mainers.

Hand-printed organic linen tea towel,
$18, from madder root on Etsy here.
They've got napkins too.
Would it be unreasonable to suggest that you have a gorgeous blue teapot shipped from Australia? I suppose the answer depends on where you are. It's hand-built and beautifully glazed and I can't stop looking at it.
Deep crystal blue teapot by Claystone Pottery, $120 AUD,
from Mr Kitly here.
The same shop has the most charming potholders I've ever seen, by a concern called At-Swim-Two-Birds, which I'm guessing is named after one of my favorite books ever.
At-Swim-Two-Birds pot holder #3,
$38 AUD from Mr Kitly here.
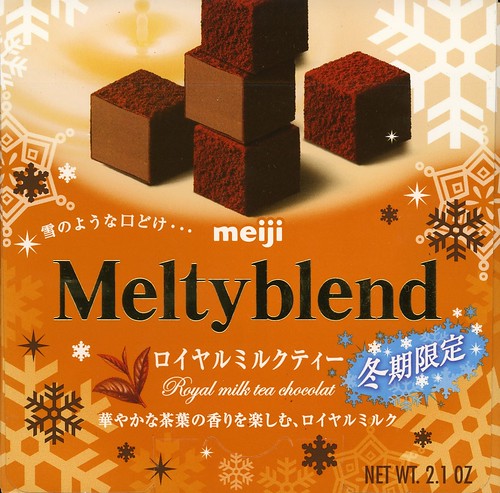
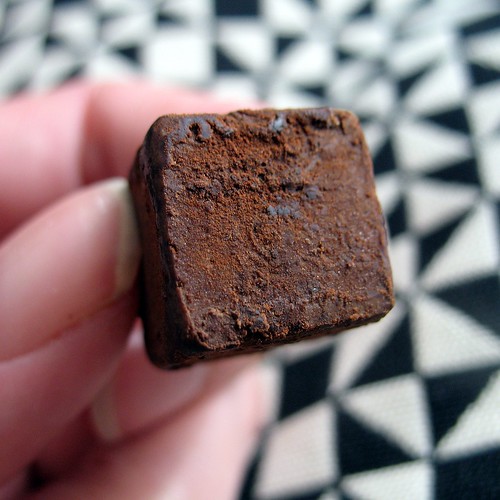
I haven't forgotten about getting the Japanese Candy Quarterly Review under way. I've scanned and munched so much candy, urgh! Coming soon. In the meantime, I recommend a box of Meiji Meltyblend Royal milk tea chocolates as a holiday treat for any and all candy enthusiasts. The milky tea flavor is spot-on, and the texture is really pretty classy, even compared to handmade chocolates — they're little cubes of firm (but also somehow fluffy) ganache with a silky texture.
Meiji Meltyblend Royal milk tea chocolates,
approximately $3.50 for a box of fifteen or so.
If you're in NYC, try Sunrise Mart or Katagiri.
I wouldn't refuse a box of Woodhouse Chocolate, either. I've sent their candies to people over the years and they've always been very well received, but I've yet to taste any myself. For the holidays they have Santa in various shapes and sizes and beautifully decorated trees, but I'm drawn to the friendly-looking penguins and snowmen. And the caramels with exotic salts. And the quatre epices hot chocolate, and the eggnog snowballs filled with bourbon and nutmeg ganache. Their year-round chocolates come in intriguing flavors too, like Thai ginger, and brown butter ganache.
Woodhouse is based in California. Closer to home, I really like Li-Lac Chocolates. They've been making chocolates and other confections in NYC's west village since 1923. If I'm out and about anywhere near their shop, or their counter at Grand Central, I always stop by and pick up a little something(s), often malt balls, and a basic dark chocolate bar. Their chocolate always tastes very freshly made and it's just really, really good. Of course they do all sorts of holiday shapes and gift boxes, but what I'd most like to give or receive are the year-round ones. I'm particularly a fan of the cat, the t-rex, and the Jaguar. Sometimes they have these in the shop — and they're always available through the website, in milk chocolate, dark, or white — but if you're in the area and have your heart set on a particular one, call ahead. They used to have a brontosaurus and I've secretly always wanted one of those with a ribbon round its neck, but I don't see it on the site. Maybe it's still available?


Li-Lac Chocolates kitty, $14, Tyrannosaurus Rex, $12.50, and Jaguar, $25,
Do you know someone with a small foodist in training? This Pippi Longstocking pancakes tray would be great for sick-day breakfasts in bed, or for any day, really.


Pippi Longstocking pancakes tray, $28.50
from Huset-Shop here.
It's good to have a calendar in the kitchen so you don't lose track of your pickling projects. This "Buy Local" one by Claudia Pearson features seasonal fruits and veggies for every month.


"Buy Local" 2013 calendar by Claudia Pearson, $24.
Available on Etsy here.
Beer people get a calendar of their own by designer and illustrator Heidi Schweigert, with a beer and an ideal food pairing for each month.

BEER/FOOD 2013 calendar, $24,
available from redcruiser on Etsy here.
If you happen to know that your cook likes a clean, graphic, possibly Scandinavian-influenced style and has a bare spot on his or her kitchen wall, how about a print of winter fruits?

Winter fruit print by Claire Nereim, $50, on Etsy here.
It's 19" x 25" and there's a handsome summer fruit one, too.
It's 19" x 25" and there's a handsome summer fruit one, too.
I like this big pomegranate a lot, too. It's 20" x 27" and will fit in a poster frame.

Indigo pomegranate giclée print by anek,
$80 on Etsy here.
If your cook has a thing about breakfast, this print by painter/illustrator Becca Stadtlander will fit in an 8" x 10" frame and would look great propped on a kitchen shelf.

on Etsy here.
L'annine hand cream for your favorite cook's stocking,
$16 at Beautyhabit here.
For the mango aficionado, how about this print by Ramalamb? It doesn't come framed but it will fit in an IKEA RIBBA.

Last but not least, you know what makes me happier than just about any other box of holiday this-or-that? Other than really fancy marzipan? Impeccably candied fruit, glowing from within. These clementines from Confiserie Florian are plump and gorgeous. Might as well pick up a packet of candied angelica and some Provençal flower-flavored syrups at the same time, no? I have a feeling that bowls of vanilla ice cream drizzled with mimosa and violet syrup would make January and February a little easier to get through.

Mango print by Ramalamb, $19,
Last but not least, you know what makes me happier than just about any other box of holiday this-or-that? Other than really fancy marzipan? Impeccably candied fruit, glowing from within. These clementines from Confiserie Florian are plump and gorgeous. Might as well pick up a packet of candied angelica and some Provençal flower-flavored syrups at the same time, no? I have a feeling that bowls of vanilla ice cream drizzled with mimosa and violet syrup would make January and February a little easier to get through.

Confiserie Florian candied clementines,
€24.50, here.

Confiserie Florian Provençal syrups
(mimosa, rose, poppy, and violet), €20.50, here.