Monday, June 18, 2007

a new favorite cooking show

I learned of Andreas and Christina Theodoulou on Ananova, which reported that "[a]n elderly Cypriot couple from London have become an unlikely internet hit with their cookery videos," which are shot, edited and uploaded by their son, Orthodoxos.


You can watch more of their videos here.

If you are not familiar with Ananova, by the way, it's handy for catching up on news about sulking old Serbian ladies, cannabis-munching Swiss cows, and the latest trendy pets in Japan.

Tuesday, June 12, 2007

Committee descends into frittata madness

Frittata, constantly cooking in my cast iron pan, clarifier of my conscience. My kitchen guilt, my reluctance to rid my refrigerator of the remains of last week's farmers' market reverie. Free-tah-ta: the ragged, rapidly decomposing tops of radishes will make themselves at home in a radial swirl on your surface, a relief map of greens I brought home in a rather more fresh state, oh when? Could it have been a week ago? They'll be resuscitated with a rounded spoonful of ricotta cheese. Free. Tah. Ta. Ready recipient of any resourceful cook's remnants.

My apologies to Mr. Nabokov, who hopefully would have laughed at the sight of his prose — an enthusiastically scrambled tribute to it, at least — being retrogressively used to prod readers into cooking more rustic egg dishes. On a blog, at that.

There are several reasons to appreciate the frittata, the first being its ability to accommodate disparate vegetables hiding in corners of the refrigerator, an end of cheese reduced to a small pile of gratings, a single cold steamed potato, even half a cup of cold pasta that would otherwise be thrown away. In my experience, the longer one cooks, the greater one's pleasure in being thrifty, in not letting things go to waste. Particularly if one had plans for the produce in question — a bag of mixed lettuces that had been destined for a soufflé, until the Gruyère that was to stand in for the Cheddar accidentally got eaten, or a prodigious bundle of parsley that was to be used for a pot of green butter, which was in turn to be used to make little sandwiches. All of these things can go into a frittata, and the end result may be as harmonious as if you'd planned to use them for that purpose all along.

The second reason to appreciate the frittata is its versatility. It's great served warm from the oven, but just as nice at room temperature or even cold the next day. It can be cut into bite-size cubes and served as a snack with drinks, or it can be sliced and draped over a salad, or made into a sandwich.

The Silver Spoon, which has been referred to as "the Bible of Italian cooking" so often that my fingers type those words on their own, has, of course, instructive advice on frittatas. For starters, I had the plural wrong:

Italian omelets — frittate — are economical and quick and are among the tastiest dishes that can be made with eggs. They are also very versatile, as the basic recipe may be enriched and flavored with a wide range of other ingredients, including herbs, vegetables, fish, cheeses, salami, ham and fruit. As regards quantities, in general allow two eggs per person if the frittata is served as a main course and one if it is an antipasto. As a general rule, 1 1/2 teaspoons butter or olive oil is required to cook every two eggs.

The Spoon contemplates frittate thin enough to be flipped in the pan, and cooked on each side for just 1-2 minutes (or "2-3 minutes if there are more than four eggs"), but there are as many ways to prepare a frittata as there are cooks. If you are only using a few eggs, sure, flip it over in the pan, but if you are making a frittata that is more substantial, with half a dozen eggs or more and a pile of greens or who-knows-what, you must decide how to cook it through: Do you want to begin cooking it on the stove top and end with baking it in the oven, or do you want to mostly cook it on the stove top and just brown the top under the broiler? Are you determined to bake it in the oven for the duration of cooking? I've never tried the latter method and would be afraid it would dry out, since a frittata lacks the rich measure of cream that allows quiche to survive a long baking. I tend to make large frittate with 6-7 eggs and my method of choice depends both on what else I have cooking and what I've stirred into the eggs: If I have the oven heated up to 350-400°F for some other dish, I'll likely cook the frittata for 5-10 minutes on the stove, stirring occasionally with a wooden spoon or silicone spatula during the first two minutes to evenly distribute the ingredients, and then put it in the oven for approximately 10 minutes, or until it's set (i.e., no longer liquid in the center). If my frittata has grated cheese on top rather than stirred in with the other ingredients, I'll likely cook until it's almost set on the stove top, scatter the cheese on top, and put it under the broiler for just a minute. More often than not I use a method very similar to the scramble-and-broil method described by Pim (of Chez Pim) in this post, but I heat the olive oil over high heat and then do my almost-scrambling over medium or low heat, particularly if my ingredients are already warm or hot — adding just-sautéed greens, or crumbled and browned sausage, or any other ingredients that haven't cooled down will speed up the cooking time by a minute or two, and it's better to err on the side of undercooking rather than overcooking the eggs. You can always put the frittata into the oven for more cooking if you go to cut it and find that it's disconcertingly squishy under your knife. It should be firm but springy when it's done.

There's a way of flipping the frittata by inverting it on to a plate, but you've got to be sure that you have just the right size sturdy plate clean and ready to go at the crucial moment, and that you have two oven mitts handy, and what will you have gained? A cold oven. Useful on a hot summer afternoon, or if you are cultivating the carbon footprint of a saint, but otherwise it's hard to see what the advantage of that method is.

I was going to give four or five recipes for some of the best frittate we've had recently, but I didn't measure the ingredients for any of them. I never do. So, I'm just going to give you suggested combinations, followed by one recipe for what would be my favorite frittata of all, if it were a frittata and not a kuku.

golden frittata


Ramps, spring garlic, scallions, feta cheese Despite my remarks above about the virtues of ransacking the refrigerator for bits of this and that, the best frittate are premeditated to some degree, hopefully while buying the eggs at the farmers' market. I wanted something special for a frittata made with the Araucana eggs I'd picked up, and I set aside bundles of the last ramps of the season, green spring garlic, and a few scallions (green onions), and 3-4 ounces of crumbled sheep and goats' milk feta cheese. I chopped the bulbs of the ramps and the spring garlic and sautéed them in a couple tablespoons of olive oil until they softened, added the chopped greens from all three alliums and sautéed them until they wilted, then added six eggs beaten with the cheese, salt, pepper and a bit of freshly grated nutmeg, and cooked as described above. The result was a golden frittata filled with a fragrant tangle of greens and soft, flavorful cheese.

frittata innards


asparagus, mint and tarragon frittata


Asparagus, mint and tarragon There is something about the combination of eggs and mint that I can't imagine tiring of. Both mint and tarragon are strong flavors but somehow this worked. The asparagus can be steamed, blanched, or roasted as long as it is tender but still crisp. I chopped the asparagus into bite-sized pieces but if you have more patience for adorning your frittata you could neatly arrange the whole spears on the surface before it sets in the center.

artichoke heart frittata


Artichoke hearts, red onion and rosemary I used artichoke hearts canned in water, which I rinsed under cold water and patted dry. You've got to be mindful about not adding too many wet ingredients to a frittata; otherwise it won't cook properly. For this reason, I tend to stay away from tomatoes unless they've been slow-roasted or otherwise dried out, or unless they're firm plum tomatoes. Once the artichoke hearts were reasonably drained, I chopped them into bite-size pieces and sautéed them, with chopped red onion, in a few tablespoons of olive oil until they started to brown. I added a tablespoon or so of chopped rosemary, then the beaten eggs, and cooked as described above.

dandelion greens dandelion green frittata


Aburana with grated Kashkaval cheese Kashkaval is a Bulgarian sheeps' milk cheese with a mildly tangy flavor. I thought it would pair nicely with the greens, which I found at the Japanese grocery in a bag labelled "Aburana." I thought they were dandelion greens but my Googling thus far indicates only that they might have been some type of rapini. I sautéed the greens in olive oil (with a sliced shallot and some red pepper flakes, if my memory is correct), added the eggs, and then added the grated cheese on top when the eggs were almost set; it melted nicely, and fast became crisp and browned under the broiler.

dandelion green frittata


Kuku-ye Sabsi (pictured below) is an Iranian frittata-like dish traditionally made on New Years' Day. It's loaded with herbs, and the vibrant green color reflects hope that the year ahead will be a prosperous, happy, healthy one. I'm crazy about it and make it throughout the year, in the spring and summer with as varied a mix of herbs as possible, and in the winter with spinach and parsley and cilantro. The recipe below is from Claudia Roden's New Book of Middle Eastern Food. There's a similar recipe in the Boston Post which calls for currants rather than raisins; my guess is that in Iran it would be made with currants but they're not always easy to find, and it's great with raisins too. Roden indicates that the walnuts and the raisins are optional but I urge you to try the recipe with both, even if you are not a raisin person. I'm not, but the frittata that set me on the path to my frittata-enamored madness, years ago, was made with tuna and golden raisins and who-knows-what-else. I ate it at a tiny café in Lisbon on my way to Saint George's Castle, and I probably never would have ordered it had they had anything else to serve me but it turned out to be one of the most memorable lunches I've ever had.

Kuku-ye Sabsi
serves 6

6-8 eggs
4 ounces spinach, shredded
8 scallions, chopped
1/2-2/3 cup mixed chopped fresh herbs
[In the note preceding the recipe Roden says "Any favored herbs, such as flat-leaf parsley, dill, chervil, tarragon, chives and cilantro, may be used."]
3 tablespoons chopped walnuts (optional)
2 tablespoons raisins (optional)
Salt and pepper
2 tablespoons butter or vegetable oil

Lightly beat the eggs with the rest of the ingredients except the butter or oil.

Grease an ovenproof dish (about 10 inches) with butter or oil and pour in the egg mixture. Bake in a preheated 325°F oven for 45 minutes, covering the dish for the first 25 minutes, until the eggs are firm with a golden crust on top. Alternatively, cook the kuku in a large preferably nonstick skillet. When the eggs have set on the bottom, brown the top under a hot broiler.
[See my comments above for more details on this method of cooking. - TBC]

Serve hot or cold as a first course, accompanied by yogurt.

kuku-ye sabsi


The best way to prepare the yogurt, in my opinion, is to start with good yogurt and set it to thicken in a sieve lined with a coffee filter, perched inside a bowl to catch the drips. (If you're doing this several hours ahead of time, cover the whole set-up with plastic wrap and put it in the refrigerator). Once the yogurt is nice and thick, blend in some chopped mint or cilantro and a pinch of salt, and maybe a tiny bit of minced garlic. Very good on leftover frittata or with toasted pita.

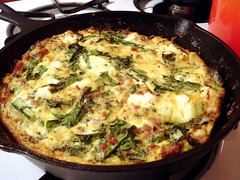
The frittata pictured at the top of the post was made with puntarelle, turkey sausage and ricotta cheese. I posted a recipe for it last August, which you can read here.

Wednesday, June 06, 2007

a few words on scallops

Is there a season for sea scallops? Twice in the past couple weeks I've found terrific local ones from Long Island fisheries, first from from P.E. & D.D. Seafood (which I bought at the Union Square greenmarket), and then from Pura Vida Fishery, which started selling their catch at the Tompkins Square greenmarket for the first time (I think!) last Sunday. I linked to some photos of the P.E. & D.D. Seafood crew in my Memorial Day post but I couldn't find much information on the latter aside from a podcast interview with the captain and a few photos of their stand at another greenmarket last summer, and I was so excited to see seafood at the Tompkins Square market that I didn't think to ask whether they'd be regulars until I was nearly home with my bag of scallops. We are sorely lacking decent fish markets in the neighborhood, and the thought of being able to buy fresh local seafood a couple blocks from my apartment makes me very happy.

the depths of the ocean

The natural habitat of sea scallops looks something like this.


According to the Monterey Bay Aquarium Seafood Watch guide, bay scallops* and sea scallops are both generally fine choices in terms of sustainability and health. There are plenty of websites warning that "most scallops sold in the US" are treated with additives — specifically, with STP (sodium tripolyphosphate), which plumps them up and keeps them looking moist long after they would otherwise — but treated scallops are easy to spot and I haven't seen them sold that way in years. Then again, I live in the northeast, where both bay scallops and sea scallops are well-known and much appreciated. Let's have a brief tutorial, then, so you can take the appropriate course of action if you discover that a merchant in your area sells treated scallops: run them out of town, and agitate for them to be replaced with someone who cares about seafood.

The first tip-off that scallops have been treated with additives is if they're sitting in water. Both bay and sea scallops should be moist-looking and not the slightest bit dried out around the edges, but they should NOT be sitting in an inch or more of water. Or even half an inch. Aside from indicating that the scallops may have been treated with additives, a watery container means that a good portion of the price per pound would be, of course, water. Pan-seared scallops are good for dinner; pan-seared water, not so much.

The second (and equally-important) tip-off is the color of the scallops. Neither bay or sea scallops should be snowy white. They should be a creamy beige, or slightly pinkish, or tan, but never white. Look, I made you a visual aid:

scallop project


The colors are a little washed-out thanks to my bargain-basement scanner, but you get the idea.

Scallops have a reputation for being somewhat expensive but both of my purchases were $14/pound, roughly the same price or lower than the most in-demand types of fish, and roughly the same price as the ones I see in grocery stores, and who knows where those are from? Also, there's almost no waste with scallops; 99% of the ones sold in the U.S., whether at farmers' markets, fishmongers or grocery stores, need only to have the tiny, chewy ligament attached to their side removed before they are ready to cook.

don't eat this part

Don't eat this part; it's tough and chewy. Gently pull it off and throw it away. Don't freak out if your scallops are missing this part; your nice fishmonger already pulled it off for you.


I ended up pan-searing both of my recent scallop purchases, but other than that the two meals were very different; the first featured a beurre blanc lightened by the addition of plenty of tart sliced sorrel, and in the second the scallops were given a Middle Eastern flavor with a garnish of the spice blend za'atar. Here are the recipes:

Scallops with sorrel beurre blanc
Serves 2-4.

This recipe is an adaptation of this one from Food & Wine. The fact that the original recipe calls for bay scallops necessitated a couple of rather obvious changes: sea scallops are larger and need to cook longer than bay scallops, and because of their size it is easier to cook them evenly if they are seared on each side rather than stirred around to cook on all sides. And because I would be searing my scallops and turning them only once, it would not do to add the sorrel to their pan, where it might interfere with the browning process; better to add it to the beurre blanc instead.

I was planning to otherwise follow the recipe, but at the very last minute I realized that not only did I not have Champagne vinegar, I didn't even have 1/2 cup of white wine vinegar remaining in the house. I did, however, have 1/4 cup, and I had enough Grüner Veltliner in the refrigerator to keep the Tiny Banquet household happy for at least a couple evenings, so I used a mixture of the two. The resulting sauce was deliciously well-balanced and I'd proudly serve it to anyone.
A note on the portion sizes: Chef Vongerichten recommends 1 pound of bay scallops to serve 4. We had not eaten lunch and we ate an entire pound of sea scallops between the two of us. Obviously we are little piggies, although in our defense the rest of the meal consisted only of the fiddleheads I picked up at the greenmarket. If you are serving a first course you can certainly serve more than 2 people with these scallops. Unless they are hungry pigs.

Don't be discouraged by the fact that you'll have to clarify some of the butter; it only takes a few moments, and as I've mentioned in the past, there are important reasons for using it.

3 to 4 tablespoons cold unsalted butter, cut into tablespoons, plus 1 to 2 tablespoons clarified butter
1 medium shallot, minced
fine sea salt and freshly ground pepper
1/4 cup white wine vinegar
1/4 cup good white wine, preferably Grüner Veltliner (or something similarly mineral and citrus-y in flavor)
1/4 cup heavy cream
a pinch of cayenne pepper
1 pound sea scallops, tough ligament removed
1/2 cup tightly packed sorrel leaves, tough stems removed and finely shredded

Melt 1 tablespoon of the butter in a medium-sized skillet or shallow sauce pan over moderate heat. Add the shallot, season it lightly with salt and pepper, and cook, stirring, until it just begins to brown, about 1 minute. Add the vinegar and the white wine and cook, swirling the skillet over the heat, until the liquid is reduced to a couple tablespoons. Add the cream and bring it just to a boil. Add the remaining 2 to 3 tablespoons of butter, one piece at a time, while stirring the mixture with a wooden spoon; the sauce will thicken. (It will taste best if you add 3 tablespoons of butter, but if the thought horrifies you, you can get away with only adding 2). Stir in half of the sorrel and season the sauce to taste with the cayenne pepper and a bit more salt if necessary.

Meanwhile, heat the clarified butter in a heavy skillet (preferably cast iron) over moderately high heat. Add the scallops in one layer and cook approximately 10 minutes per inch of thickness, flipping them once during the middle of cooking. (It will be easiest to turn them if they are not crowded too closely together in the pan). Transfer the scallops to plates, spoon the sauce over them, garnish them with the remaining sorrel, and serve at once.

sea scallops with sorrel sauce

Scallops with sorrel beurre blanc.


The other recipe is very different but no less delicious. I first discovered the spice blend za'atar a few years ago in my beloved copy of Madhur Jaffrey's World Vegetarian; I'm not sure what drew my attention to such a brief recipe in such a big book, but somehow I decided I had to try it, and I fell in love with the flavor. There's a similar recipe for it in Claudia Roden's New Book of Middle Eastern Food because, unlike other Middle Eastern spice blends, za'atar (sometimes spelled zaatar or zahtar) is simple: it's only got four ingredients, maybe just three if you want it unsalted. According to Roden, za'atar is "wild thyme. It is also the name of the mixture of this herb with sumac, salt, and toasted sesame seeds. The mix, which is popular in Syria, Lebanon, Israel, and Jordan, is sold in little paper cornets to dip into with bread." It's great on all sorts of other foods, though; sumac is made of ground tart, red berries and like lemon, it brightens every dish it goes into. In colder weather I particularly like za'atar on roasted sweet potatoes. Now I know I love it on scallops, too.

sumac homemade za'atar


Any decent spice store will sell a pre-mixed version made with dried thyme, but it only takes a couple minutes to make your own with fresh thyme and the result is much more flavorful than any blend commercially available here.

Seared sea scallops with za'atar
Serves 2-4 (see comments above regarding portion size).

This recipe makes more za'atar than you'll need but it's not practical to make a smaller quantity, and it will keep well for a few days in a tightly-sealed container.

1 rounded tablespoon thyme, leaves only
2 rounded teaspoons sumac
2 rounded teaspoons toasted sesame seeds
coarse salt, to taste
1 to 2 tablespoons clarified butter
1 pound sea scallops, tough ligaments removed

Stir the first four ingredients together in a small bowl and set aside.

Heat the clarified butter in a heavy skillet (preferably cast iron) over moderately high heat. Add the scallops in one layer and cook approximately 10 minutes per inch of thickness, flipping them once during the middle of cooking. (It will be easiest to turn them if they are not crowded too closely together in the pan). Transfer the scallops to plates and sprinkle them generously with the za'atar. Serve at once.

seared scallops with za'atar

Sea scallops with za'atar. We ate these with some chickpeas flavored with a Yemeni spice blend called zhough, which is getting it's own post here soon.


* I don't see bay scallops around Manhattan often, but if you have an opportunity to buy them there is no reason to be snobbish about their comparatively diminutive size; some people prefer their flavor over sea scallops, believing them to be slightly sweeter.
Thursday, May 31, 2007

for your reading pleasure

There's nothing like a little tidying-up to lift one's blog depression.

You may have noticed that I added a customized Google search feature over on the right hand side there. Remember when I made that big pot of pink pudding? Or the shortbread barnyard? You can now search for those posts instead of trying to remember which month they were in.

You may also have noticed that my e-mail address (located near the upper-right corner) has changed: it is now tinybanquet [at] gmail dot com. Personally I find this refreshing; handing out a Yahoo address was a bit like walking around in petticoats and a monocle.

There will be a few more little changes during the next week or two and I want to apologize in advance to those of you who read my RSS feed: I am going to be adding labels to some of my older posts and will also be enlarging some of the photos to match the size I currently use, and as a result these posts may show up as new in your RSS reader. Hopefully that won't happen, but it's a possibility.

I'm planning to use the labels on the posts to create a menu from which someone can choose to view, say, only soup recipes, or only vegetarian recipes, etcetera, etcetera. As for the photo sizes, the template I started out using was a little cramped, and some of the photos were smaller than they need to be. If you spot a dog hair in any of the newly-enlarged photos, e-mail me and I'll send you a suitably cheap trinket.

Not sure what an RSS reader is? I will explain to save you the embarrassment of asking someone snottier about these things than I am: it is a technology that allows you to smell the aromas from food blog photos right through your monitor.

Ha, ha! No. But it's really useful. It is a technology that collects the most recent posts from blogs and news feeds that you subscribe to, so that you can go to one place to see what's new, rather than visiting all your bookmarked sites. There's a decent guide to them here.

Don't be shy about inviting lactarded people to your next party

So that your guests who have issues with cows' milk will know what they can eat, porcelain sheep, cow and goat heads for your cheese. $9.99 from Fante's Kitchen Wares Shop.

Wednesday, May 30, 2007

salad with issues;
what happens when you broil lemons?

radish greens salad


This salad was going to be so delicious: perfectly fresh radish greens from the greenmarket (Windfall Farms) with tender, cotton candy-pink stems, crisp Mutsu apple (Red Jacket Orchards still has good apples), ginger candied almonds, toasted sesame vinaigrette. These flavors were a nice combination — mildly spicy greens and nuts, juicy apple, and a light but well-balanced dressing — but the salad was uncomfortably difficult to eat. The radish greens are too small to be speared with a fork and too crisp to be twirled like spaghetti, and the candied almonds tend to fall off one's fork. Recipes for the almonds and the salad are below, but I think you'll have an easier time of enjoying them if you use them to fill a Vietnamese summer roll.

First, the almonds. This recipe is an adaptation of David Lebovitz's salt-roasted peanuts, which I love. I used powdered ginger rather than fresh because raw almonds need to be roasted for a relatively long time and I was worried about the ginger burning. I also thought it would be easier to distribute evenly over the nuts, which get coated with a very sticky sugar mixture. If you try this with fresh ginger, let me know how it works out. Also note that in David's recipe he calls for good sea salt; I don't think it makes sense to use your best salt in this version because it would only be obscured by the flavor of the ginger. Kosher salt is fine.

ginger candied almonds
adapted from David Lebovitz's salt-roasted peanuts

2 cups raw almonds
1/4 cup light corn syrup
2 tablespoons light brown sugar or turbinado sugar
2 teaspoons powdered ginger
1 1/2 teaspoons coarse or kosher salt

Preheat the oven to 350° F.

Lightly oil a baking sheet or line it with a silicone baking mat.

In a bowl, mix together the corn syrup, the light brown sugar and the ginger. Add the almonds and stir until they are thoroughly coated with the mixture.

Spread the almonds out evenly on the baking sheet and bake for 30-35 minutes, or until they are deep brown in color. Stir them at least once during cooking, and rotate the pan halfway through if it looks like they're browning unevenly.

When you take them out of the oven, the glaze will be sticky and bubbling. Working quickly, stir them with a silicone spatula so that they don't stick together as they cool. If they stuck together in impossible clumps as they cooled, heat them in a 300 or 350° for five minutes or so, just long enough to soften the coating so that you can give them a good stir again.

The almonds will stay crisp in an airtight container for several days.

Yield: 2 cups.


Salad of radish greens, apple, and ginger candied almonds, with toasted sesame vinaigrette
serves 2

1 tablespoon grapeseed or canola oil
1 1/2 teaspoons toasted sesame oil
1 1/2 teaspoons rice vinegar
fine sea salt and fresh ground black pepper
1 box radish greens (approximately 2 cups of greens, not packed-down)
1/2 of a Mutsu apple (also sold as Crispin apple), sliced into thin bite-size wedges
2-3 tablespoons ginger candied almonds (see recipe above)

Whisk together the two oils and the vinegar in a small bowl and season to taste with salt and fresh ground black pepper. Mound the greens on two plates and distribute the apple and the almonds among them. Drizzle with the dressing and serve immediately.


Our main course was free of issues and I'll likely make it again when I want something really simple and easy: cod with chives and broiled lemon. I love lemons as they are but I was curious as to how their flavor might soften if they were broiled for a few minutes. (Grilling would be preferable, of course, but my fire escape isn't conducive to that). They didn't quite caramelize into lemon candy, but their flavor did soften considerably and it was possible to eat entire segments of warm, juicy lemon without overpowering the fish.

broiled lemon


I strongly recommend that you use organic lemons for this recipe, since you'll be exposing the peel to high heat. You only need one lemon for this dinner but you might as well make two as long as you have the broiler heated up; the other lemon can be used for salad dressing or squeezed on vegetables later in the week.

cod with chives and broiled lemon
serves 2

2 organic lemons, sliced 1/2" thick
enough olive oil to brush the lemon slices and the fish (approximately 2 tablespoons)
coarse salt and freshly ground pepper
2 cod fillets, approximately 6 oz. each
a small bundle of fresh chives (enough to yield 2-3 tablespoons when minced)

Turn the broiler on and arrange the lemons in a heavy, oven-safe pan. (I used a cast iron grill pan covered with foil; it's super-easy to clean up afterwards). Brush them with olive oil and broil them for 2-3 minutes, or until they are well-browned in spots. Remove the pan from the broiler, flip the slices over, brush their other side with olive oil, and return the pan to the broiler until the lemons are well-browned on each side.

Remove the lemon slices to a plate or bowl and arrange the fish fillets in the same pan you used for the lemons. Brush them with olive oil and season them with coarse salt and freshly ground pepper. Broil them for ten minutes per inch of thickness. If they are becoming too brown under the broiler, take them out, turn the oven down to 375° and finish cooking them in the oven. (Usually this is not necessary).

Plate the fish and snip or mince the chives. Squeeze 2-3 slices of broiled lemon over each fillet of fish, letting the juice and the segments of the fruit fall on the fish. Sprinkle the chives over the fish and serve at once.


cod with chives and broiled lemon

Cod with chives and broiled lemon; on the side are roasted Carola potatoes tossed with fresh oregano.


P.S. I did not steal my salad plates from The '21' Club; I'm much too clumsy for that sort of thing. They came from Fish's Eddy, which sells restaurant and airline dishes and utensils along with their own well-designed stuff.

Saturday, May 26, 2007

While you were stuck in a Memorial Day traffic jam

I was at the Union Square greenmarket, waiting for Mr. Picky-Pants in front of me to finish selecting his fiddleheads one curly bit at a time. Maddening! Here's today's haul:

part of today's haul

A fluffy bundle of thyme and several loooong branches of rosemary ($1.75 each from Stokes Farm), and some rhubarb ($2.50, I think; can't recall who grew it).


Sweet William

An armful of Sweet William ($4, from the same people who grew the rhubard). Don't worry, we're not going to eat it.


fat organic beets

Two fat organic beets with abundant greens, from the people who also sell home-made kimchee. I can't remember how much these were but beets are never pricey. These beets are destined to become beetroot, cardamom and sour cream soup; I'm not yet sure what I'll do with their greens.


French sorrel

A quarter of a pound of organic French sorrel ($4.50-$5), from the same people who grew the beets. It's expensive but it's one of my favorite greens. I also picked up a pound of nice-looking sea scallops from P.E. & D.D. Seafood and this sorrel is likely going to be used to make a sauce for the scallops. I really want to try this recipe for butter-braised radishes with sorrel too; maybe next week.


plump shallots

Plenty of over-sized shallots ($2.50 for a small basket, from a stand in the southwest corner of the park).


fiddleheads

A pint of fiddleheads from Mountain Sweet Berry Farm ($4). These are what I went to the greenmarket hoping to find. Like ramps, they can be hard to come by even during their very brief season. They are ferns that have yet to uncoil; they're prized in Maine but happily they grow within NYC greenmarket range too. This recipe is very simple and very good; it's the only fiddlehead recipe I've ever used but they come out perfectly tender and I'm going to keep using it. If you're inclined to pickle things (ahem!) there are a few recipes here for pickled fiddleheads.


the last ramps of the season

A bundle of ramps ($2.50, I think), also from Mountain Sweet Berry Farm. According to their sign these are the last ramps of the season. I know I've said I could eat ramps with fresh pasta every week but I've just had my biannual carb freak-out so these will likely go into some sort of egg dish.


Araucana chicken eggs

Good thing I got eggs, then. These odd-colored and irregularly-sized beauties are from pasture-raised Araucana chickens, a distinctive rumpless breed originally from South America and now raised by fanciers in the U.S. and elsewhere. These were expensive eggs, $7/dozen, but I always buy local free-range eggs at the greenmarkets so I like to invest in super-delicious eggs. I wasn't really thinking when I asked the guy who sold these what's different about eggs from pasture-raised chickens but on the way home I thought about his explanation and realized that these chickens are really rather better-off than others — a "free-range" chicken doesn't necessarilly have a pasture to loll around in.

Monday, May 07, 2007

ramps and ramps

fresh pasta with ramps


Pasta with ramps; ramps with pasta — we've had this for dinner twice in the past two weeks and if I can find more ramps this week we'll have it again. This year's ramps seem to be milder in flavor and less pungent than in previous years, possibly because of the wet weather we had recently, but I love them anyhow.

My understanding is that ramps are wild leeks that grow in mountainous regions in parts of the U.S. for just a few weeks each spring. They are the first item I've looked up in The Oxford Companion to Food and not found an entry for; nor is there any information about them in the entry on leeks. I have only heard of them growing in the Catskills and the Appalachian Mountains, but quite possibly they are found elsewhere.

It's hard for me to explain what it is about ramps that I love so much, but I think it's their texture as much as their flavor: they come as close to melting as any vegetable can. They are at their best when prepared simply and served with minimal distractions.

The recipe below is basically a stripped-down version of a recipe that appeared on Gothamist in 2006. My version of it has three changes: (1) I believe fresh pasta, not dried, is a far better partner for the ramps. Cooked just right, fresh pasta and ramps will have the same luscious texture. (2) I omitted the pork. The original recipe calls for speck, prosciutto, or bacon, and while I love all three of those things, I prefer my pasta with ramps as simple as possible. (3) I use only one egg, in deference to Italian Boyfriends of The Past who used one egg, not two, to make me perfect plates of pasta with grated cheese.

A couple more thoughts before the recipe: Like leeks, ramps are grubby little things that need to be washed in at least two changes of water, possibly three. The easiest way to wash them is, of course, with a salad spinner: Pull off any slimy outer layer (sometimes covering the bottom two-thirds of the white and pale purple parts) and trim off the frizzled ends of the bulbs, wash them well in plenty of cold water, and spin them dry. Second, I have noticed a lot of people walking away from the farm stand with a single bundle of ramps — a perfectly reasonable way to try an unfamiliar vegetable, but for this and most other dinner recipes you'll need at least two bundles. If you only have one lonely bundle, either halve the recipe and serve the pasta as an appetizer, or make ramps and scrambled eggs for 2 instead. (Chop the bulbs, cook them until soft in a combination of butter and olive oil; then add the greens and cook for a minute or two longer, until they are thoroughly wilted; then add 4 or 5 beaten eggs and scramble as usual).

ramps ramps


Fresh pasta with ramps
Serves 3-4.

2 bundles of ramps, washed thoroughly
1 pound fresh pasta, any flat ribbon shape (tagliatelle, linguine, fettucine)
2 tablespoons olive oil
2 to 3 tablespoons butter
salt and freshly ground pepper
1 egg, lightly beaten
the best parmesan you can buy, grated on a microplane or the small holes of a box grater — at least 1 cup

Fill a large stock pot with cold water, salt it generously, and bring it to a furious boil.

Chop the root ends of the ramps and sauté them in the olive oil over medium heat until they soften, 1 to 3 minutes. Season them with salt and freshly ground pepper. While they're cooking, slice the green leaves in half lengthwise, and again in half crosswise if they're large. Add them to the pan with the roots, along with the butter, and cook, stirring, until they are thoroughly wilted. Remove from the heat and set aside.

Cook the pasta as directed, reserving about 1/2 cup of the water before you drain it. (You may need to drizzle a bit of the water into the finished dish if it looks dry). It is better for the pasta to be slighly under-done; if the ramps have cooled you'll need to return the pot to the heat until everything is heated through, and you don't want the pasta to turn mushy.

Return the pasta to the pot and stir in the ramp mixture, the beaten egg, and approximately 1/2 cup of grated cheese. Toss gently until combined. (If the ramps were done before the pasta, you may wish to do this over low heat). Add a bit of the pasta water, a tablespoon or two at a time, if the egg and cheese mixture is clumping. (If you've drained the pasta gently and left a bit of water clinging to it, you probably won't need the additional water). Taste for seasoning, and serve with additional grated cheese at the table.

pasta with ramps